
Aircon Removal After End Of Lease
October 3, 2022
Things To Know About Removing Overlay Laminate Flooring
October 19, 2022How to Remove A Chandelier Myself?

How to Remove A Chandelier Myself? Many people like to install chandeliers in their homes because they perfectly light up and decorate your room. It also plays a decorative role in some decor designs in dining rooms, entrances, and bedrooms. Hanging a chandelier in your home doesn’t mean it will stay there forever.
Chances are that it may stop working and you need to replace it. Or perhaps it is the end of your tenancy and you would be required to reinstate the property. Furthermore, you may want to update or change fixtures to update your room. If you are wondering about the steps of how to remove the chandelier, read on!
Today we are going to share with you some tips on some of the steps to follow to remove the chandelier by yourself. Let’s get started!
Equipment Needed to Get a Chandelier Down:

Here are some of the equipment that you need to have to help you in removing the chandelier:
- Screwdriver
- Ladder
- Wire stripper
- Hand gloves
- Blanket
- Sticky tape
- Plastic zip-lock bags
- Pliers
Steps To Remove A Chandelier
Turn off the electricity
Before doing anything else, make sure that you turn off the electricity. Look at the central electricity panel and then switch it off to ensure that there is no electricity supply to the chandelier circuit. Most circuits are labeled to easily determine the desired circuit but if they are not labeled, then it is recommended to switch the entire home electricity supply. After that, confirm that the lights do not turn.
Lay the Blanket and Set the Ladder
Take your blanket and then lay it under the chandelier. Ensure that you use a soft and large blanket that will catch everything if there will be anything dropping whenever you are removing the chandelier. Also, a blanket will assist you if you drop the screws when removing them.
After that, set up your ladder and makes sure that it is balanced so that you do not fall off it. In case you have a partner, you can ask them to support the ladder as you do the job. If your room has a low ceiling, then you can use a chair or a table to reach the chandelier. You should not forget to wear gloves before starting to change the fixture.
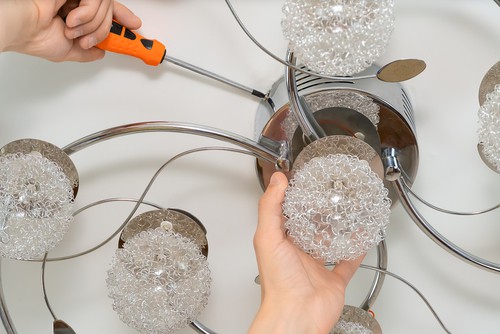
Unscrew the fixture
The next step is to remove any parts that are detachable from the fixture including glass covers and light bulbs. Normally decorative canopy pieces or plates are hidden in the ceiling hardware and actual wall. You will need first unscrew them before you reach the wiring.
In case you are removing a heavy chandelier, it is important to have a helper so that you can manage the chandelier’s weight. If the chandelier is lightweight, then you can hold it with one hand and then nuts and screws slowly. Also, do not depend on the blanket to catch the screws. When you remove the canopy, then you will be able to see a bunch of wires.
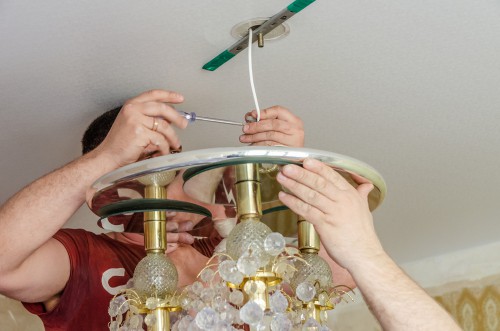
Remove wiring
After removing all the decorative bits and the plate. You should make sure that you have a clear view of the wires (white, black, and copper). Those wires should be capped and if you cannot be able to see all three wires or differentiate between wires, then it is recommended for you hire a professional to evade short circuits.
Carefully detach the caps to disconnect the wires and then use a voltage tester on the exposed wires to make sure that there is no electrical power present. Make sure that you know how to properly use a voltage tester. It is important to take note of how the wires are attached before pulling them apart.
Remove the chandelier
Make sure that the chandelier’s weight is supported by your helpers or a ladder. After disconnecting the wires and unscrewing the chandelier from the ceiling fixture box, then it is time to lower it. Make sure that you do anything slowly to make sure that you do not spoil your handwork. The old fixture is now removed and you have no lights. Make sure that you put the old chandelier in a safe place.
Measure
After getting the chandelier down, it is time to install a new hanging pendant or chandelier. You have to first figure out the length that you want to hang from your room ceiling. In case you are hanging it over the table, it is recommended to be about 30-34 inches above your table. Also, spare some time and then go through the lighting fixture that you are going to use.
You can buy a fixture that features adjustable height to make things easy for you. After you adjusted the new chandelier to the proper length, take the wire stripper and strip the wires to remove the coating. Now connect all the 3 wires carefully (white with white, black with black, and copper with copper).
Swap plates
Substitute the current hardware plate with new plates that come with new lights. After that, attach the light fixture bracket to the ceiling box to make sure that you pile the wires on the plate so that you can reconnect them.
Connect wires
The next step is to connect the wires of the chandelier to the ceiling wires and make sure that you match the colors.
Assemble
Follow the instructions given to assemble the light fixture and push the wires into the electrical box. If you are installing a large-sized chandelier, of cause it will take a lot of effort and time. After installing and screwing all the parts and installing the bulbs, recheck whether there is any screw or part is loosely attached.
Turn on the electricity
After you complete installation, it is time to go back to your central electricity panel and switch it on and your new chandelier will light up.
How to Remove A Chandelier Myself? – Conclusion

If you follow the following simple steps, then it will be simple to remove a chandelier by yourself. Remember, you have to make sure you see all the 3 wires copper, white and black before removing the chandelier fixture. If the entire process seems complicated to you, then you can consider hiring a reinstatement contractor to help you.

