
How to Remove A Chandelier Myself?
October 13, 2022
Causes and Prevention Tips For Mold On Partition Walls
December 23, 2022Things To Know About Removing Overlay Laminate Flooring

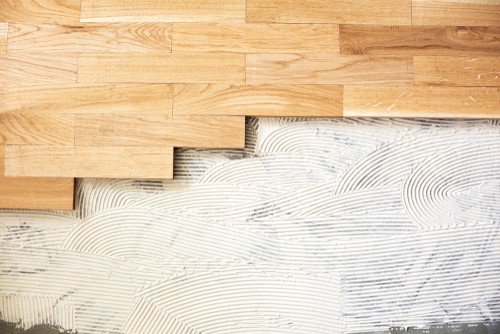
Things To Know About Removing Overlay Laminate Flooring. Overlay laminate flooring is frequently used for residential, hotel, and commercial properties to hide any imperfections in the wood or tile. The product is durable, easy to clean, and can stand up against heavy foot traffic. The process is like drywall installation, with screws and nails every four feet.
This durable material can also be glued down for a more stable base when needed. The only major downside to this type of flooring is that it discolors over time, making it an ideal candidate for replacement in homes or businesses surrounded by sunlight or artificial lights because UV rays will accelerate the degradation process.
You may need to remove the flooring for reinsatement perhaps due end of the lease after a rental period. In this article, we are here to help! Read on – Things To Know About Removing Overlay Laminate Flooring:
Best tools you can use to remove laminate flooring
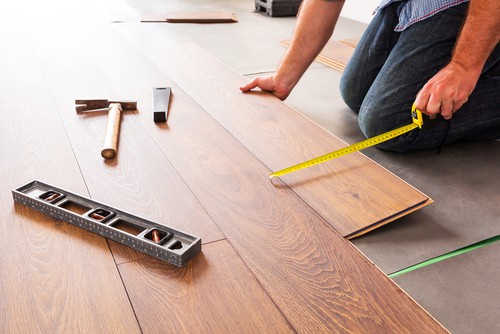
Flooring Removal Pliers
A pair of flooring removal pliers are an essential tool for any DIYer who wants to remove overlay laminate floors quickly and safely. It is designed to break away the edges of laminate flooring, allowing you to quickly and efficiently remove small sections of it at a time. Using these pliers makes no need to slash large X’s in the floor with a utility knife, which can be painful and dangerous since you are working with a blade.
Floor Jack
A floor jack is another essential tool for DIYers who want to remove overlay laminate floors. A floor jack places your home in an improved position, allowing you to work on the floor more easily with a smaller footprint and less risk of stumbling. Floor jacks can be used to pry off large sections of overlay laminate floors, making them an intriguing choice for anyone who wants to remove overlay laminate floors safely and quickly.
Post Hole Digger (Optional)
If you want to dig up one or more of your subfloors, you’ll need a post-hole digger. To use this tool, you’ll need to lay out a protective sheet between the floor so that dirt and dust cannot get into your home. Digging up subfloors will allow you to expose the floor underneath, which is the actual floor you want to remove.
Steps on how to remove laminate flooring

Prepare the Area
Before removing your laminate flooring, it is crucial to prepare the tools and materials for the job. If you have a small area, it is best to carry everything in with you, but if the area is large, it would be best to get a drop cloth and secure that around the perimeter of your workspace. That will keep debris from falling into other areas of your home and keep everything contained in one place. When removing overlay laminate flooring, you want to ensure that nothing falls or drops on top of other structures in your home.
Apply the Heat
Before you start removing your laminate flooring, it is recommended that you use a heat gun to soften the adhesive or glue securing it in place. That will ease the process and prevent you from accidentally damaging or scratching your concrete surface. When using a heat gun, ensure you are careful and only apply direct heat where the floor adheres to the concrete surface. Using too much heat can soften areas you do not want to be softened, so use caution here.
Remove stains
You can use a rotary tool with a medium-grit sanding pad to remove stains and paint. Use this tool carefully to avoid damaging the flooring by applying too much pressure. Move from side to side slowly and evenly until you see gaps between the wood’s grain and the flooring’s edge. Then remove all these marks left on the wood with a damp cloth or sponge moistened with warm water or dishwashing liquid.
You can use a scrub brush to clean up the flooring. Make sure you only use soft, fine-bristled brushes on everything from soiled grout lines and adhesive residue to stains. And pay special attention when cleaning the seams of your flooring because those are usually where pet accidents occur. Also, licking may occur because more dogs lick their paws than humans for grooming and health reasons.
Scrape away the finish
This step is unnecessary for the entire floor unless you have an extensive area. If you have a hole or crack in the floor, or if you are removing the vent in your bathroom and need to gain access to plumbing underneath, then this is the first step to take. It will allow you to reach inside your floor and pull out any foreign objects without damaging your subfloor.
Cut corners around water-damaged areas.
Cutting corners will require work with power tools like a jigsaw and circular saw. That applies especially if your overlay laminate flooring has bubbled due to mildew or mold growth underneath it. Removing the down-spots that come along the edges of your floor is relatively easy and requires only a few minutes to complete. Make sure to use a cutting blade on your circular saw specifically made for floors and make tiny cuts around the edges.
Remove the subfloor in the corners.
Remove loose subfloor pieces at the corners with a hammer and chisel or with a jackhammer and pry bar. This step is critical since it enables you to access what has been hidden underneath the wood in the corner. In this case, you will aim to remove as much of both flooring surfaces as possible because this will create nice flat surfaces for you to work on underneath them.
Replace damaged subflooring
You must replace the subfloor if you have water damage or cracks under your laminate overlay. If possible, replace all of the floors under your laminate overlay. That may not be a viable option if you only remove a small area around a door frame because it may be too much work for one worker to complete on their own. Replace the flooring in these areas with plywood or OSB sheets and secure them with nails and screws into the drywall underneath it.
Things To Know About Removing Overlay Laminate Flooring – Conclusion
Laminate flooring is one of the most popular choices and is relatively inexpensive for a home flooring project. However, it does have one downside – laminate overlay can become stained and marked by shoes, pets, or simply seasonal changes in humidity and air quality. Removing economic overlay laminate flooring might seem impossible to some homeowners; however, if you keep these tips in mind throughout the removal process, it should not be too difficult to remove it without damaging the subfloor underneath it.

